
The Naturalist Blog
*
The Naturalist Blog *
DIY Natural Whitening Toothpaste by Jenn
This blog post was written by Jenn, who is a Customer Service Specialist at the store by day and an Industrial Design student by night! She also designs and handcrafts some beautiful wooden necklaces that we carry. She has a passion for herbs and DIY body care. Read her tips for making your own natural and effective toothpaste below!
Natural & Whitening?! What kind of witchcraft is this?! For most of us, when we think of a whitening toothpaste, our first thought isn’t necessarily "natural" - but with a little help from an unlikely source it can be! Like most of you, I am a huge proponent of all things natural, and if I can make it myself - well, that's even better!
This blog post was written by Jenn, who is a Customer Service Specialist at the store by day and an Industrial Design student by night! She also designs and handcrafts some beautiful wooden necklaces that we carry. She has a passion for herbs and DIY body care. Read her tips for making your own natural and effective toothpaste below!
Natural & Whitening?! What kind of witchcraft is this?! For most of us, when we think of a whitening toothpaste, our first thought isn’t necessarily "natural" - but with a little help from an unlikely source it can be! Like most of you, I am a huge proponent of all things natural, and if I can make it myself - well, that's even better! My teeth have a tendency to stain now and again with my over consumption of tea, coffee, kombucha, and chocolate. I thought there was no hope and that I would either have to quit my delicious habits or give in to those nasty chemical ridden whitening products *shudders*. However, through trial, error, and lots of research I have put together a recipe that not only whitens but is squeezable and it only takes a few simple ingredients some you may have right in your kitchen. You can also buy all of these ingredients at Cambridge Naturals - many of them from our bulk section!

Photo credit: Jenn M
Combine all the dry ingredients in one bowl and all the wet ingredients into another bowl. Then slowly mix the dry ingredients in with the wet ingredients. Once everything is thoroughly mixed together, put it into any container (I use a little squeezable tube) and it's ready to use! This recipe usually lasts me about 2 weeks, so feel free to adjust accordingly, and enjoy your newly sparkling pearly whites!
What you will need:
2 tbsp of Bentonite Clay
3 tbsp Distilled Water
2 tbsp Coconut Oil (liquid state)
½ tbsp Baking Soda
¼ tsp Powdered Clove
⅛ tsp Himalayan Pink Salt
⅛ tsp Activated Charcoal
5 Drops Peppermint Essential Oil*
*I would NEVER suggest taking essential oils internally, but with this recipe you're not actually swallowing it and using very little!
Glazed Red Pepper-Fennel Almonds
This delicious recipe was passed along to us by Louise Rasmussen, the incredible cook at Wallowa Llamas in Eastern Oregon. Not only are these almonds incredibly addictive, but they provide a great, healthy energy boost whether you’re hiking the rocky slopes of Eastern Oregon or trekking through the snow to catch the T. We carry most of these ingredients at the store. If you’re avoiding sugar, you can substitute any great, local raw honey or maple sugar.
This delicious recipe was passed along to us by Louise Rasmussen, the incredible cook at Wallowa Llamas in Eastern Oregon. Not only are these almonds incredibly addictive, but they provide a great, healthy energy boost whether you’re hiking the rocky slopes of Eastern Oregon or trekking through the snow to catch the T. We carry most of these ingredients at the store. If you’re avoiding sugar, you can substitute any great, local raw honey or maple sugar.
Ingredients:
1/4 c. sugar (or maple sugar, honey)
2-1/2 T fennel seed
4-t-red pepper flakes
4-t salt
4-c whole raw almonds
1/4 c. hot water
Instructions:
Preheat oven to 325
Line a baking sheet with foil and spray with oil
Combine all ingredients except almonds and stir to dissolve and blend
Add almonds and coat them
Spread in one layer on cooking sheet
bake for 22 minutes stirring 2 or 3 times.
Cool for about 10 minutes then remove from foil
Store in an air tight container and enjoy!
DIY Sugar Lip Scrub
I’m not sure about you, but my lips have it rough in wintertime—pun intended. They crack, they peel, and no matter how much lip balm I use they still end up raw and chapped by the end of the day. Not the most attractive look, and it certainly doesn’t feel that great either. For dry skin in winter time, I always use a salt or sugar scrub in the shower—so I thought, why not for lips too? A little exfoliation goes a long way towards sloughing off that dry skin and keeping your lips soft and moisturized. This recipe is easy to make at home with a few ingredients, many of which we stock at Cambridge Naturals.
You’ll need:
¼ cup granulated raw cane sugar
2 tsp coconut oil
5-6 drops Jojoba or Argan oil
3 drops vitamin E Oil
2-3 drops of your favorite essential oil (I like lavender or peppermint)
Mix ingredients together in a small bowl until sugar is fully coated by the oil. There should be a little residual oil at the bottom of the bowl—add more sugar or oil as needed. Store in small airtight glass container; it should last at least 2 months.
To use:
2-3 times per week. wet lips with a little water. Take a pinch of the sugar scrub and massage onto lips with fingers for 30 seconds. Wipe off with a warm washcloth and apply your favorite lip balm.
Summer salt scrub
Ahhh, summer. Beach weekends and mid-day picnics at the park. Perfect time to catch the rays and get that mega-dose of vitamin D our bodies so desperately crave all winter. Too much sun, however, can come at a cost and lead to peeling skin and dry patches. While sunscreen or a big floppy hat should be your first line of defense, what to do once the damage is done?
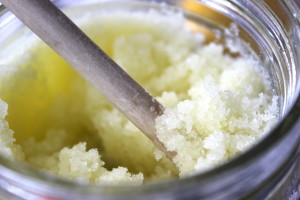
Photo credit: http://besskincare.com
Ahhh, summer. Beach weekends and mid-day picnics at the park. Perfect time to catch the rays and get that mega-dose of vitamin D our bodies so desperately crave all winter. Too much sun, however, can come at a cost and lead to peeling skin and dry patches. While sunscreen or a big floppy hat should be your first line of defense, what to do once the damage is done?
Well, first, apply copious amounts of aloe vera. We sell several great natural brands of 100% pure aloe gel– minus the creepy added fragrance and color dye (Yellow 5 and Blue 1 anyone?) of conventional brands.
Second, once the burn has faded, slough off that dead skin and leave your skin feeling clean and smooth, and freshly scented with a homemade salt scrub. So easy to make and can be a great gift for family and friends (hello, wedding season!)
Ingredients:
1 cup sea salt
1 cup almond or jojoba oil
20-30 drops of your favorite essential oil(s) (optional)
Dried lavender or rose buds (optional)
Mason jar or similar container
Instructions
1. Blend salt and your choice of oil in a mixing bowl.
2. Add the essential oil and lavender buds (optional). Stir and place mixture in a clean container and secure lid.
3. Use the scrub in the shower on damp skin, concentrating on rough areas and gently rinsing after use.